How to add Polygon to MetaMask
Published on 6 July 2022

The Polygon network has recently allowed access to the world of Web3 with wide scalability and low commissions. It defines itself as a “decentralized Ethereum scaling platform”. This has allowed developers to create decentralized applications with all the power of Ethereum, but much more accessible due to the low commissions that its operation implies.
Many people wonder how to configure the Metamask wallet to be able to operate with this network correctly and without errors. There are only few steps to add Polygon to Metamask
Polygon or Matic
A common confusion among users occurs between two words that make up the name of the ecosystem. Is Polygon the same as Matic? Has the name changed or are they different things?
To be able to answer these and other questions that can confuse, it is important to define that the network has a name and the currency has another.
Initially, both the network and the currency were called MATIC, but over time and with the evolution of the project, the developers decided to modify this unit and name the network something else, while the currency continued to have the same name.
Therefore we must be clear that currently, Polygon is the network name, and Matic is the native token name.
However, to avoid confusion, some people call the ecosystem as Polygon-Matic.
Configure Polygon in Metamask
There are two ways to run the setup. One manual and one automatic.
We will first describe the manual option to understand the process.
Setting up the polygon network in Metamask is a very simple task. We will only need a few data to achieve it. If you want to know more details about Metamask you can consult our article “Metamask: the wallet for many networks as a browser extension”. If you already have it installed and want to set up Polygon, you can get you started with these simple steps.
In the upper part of the window displayed by the extension, you will be able to see the current network that you have configured in the wallet. In general, and if you have not yet configured other networks, the Ethereum network will appear by default.
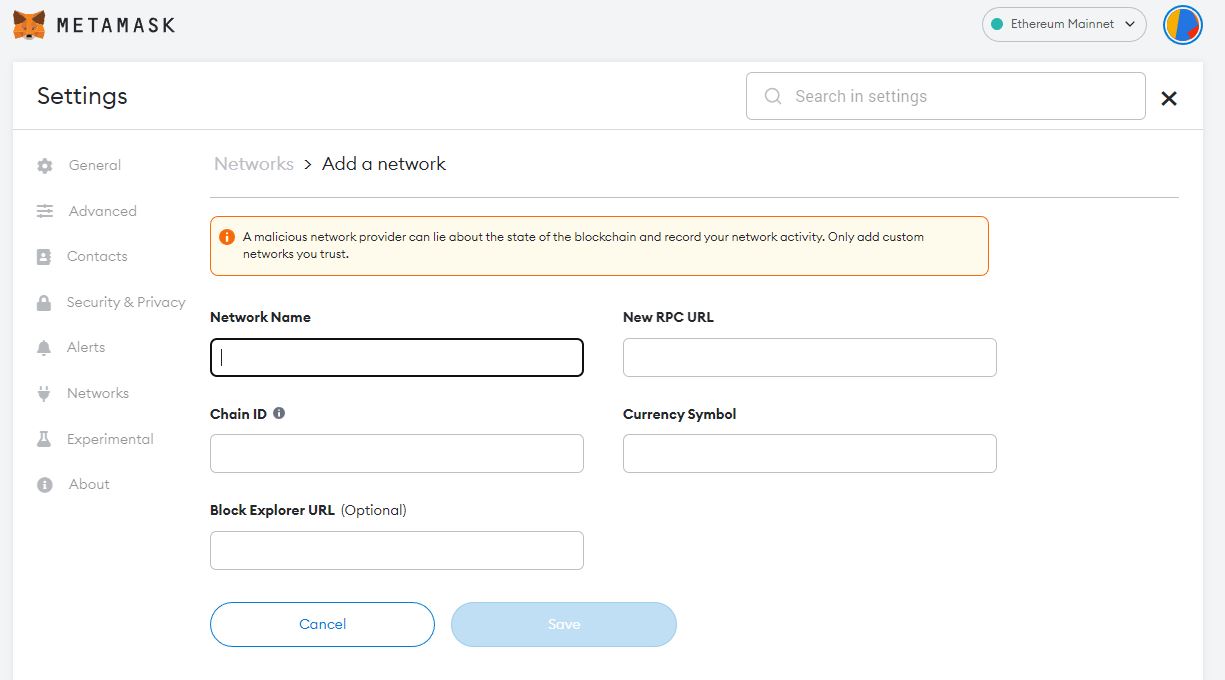
If you display this button, other networks that are already configured in the installation and an “Add Network” button will appear. When advancing with add Network, a new window will open that will ask us for the necessary data for the configuration. The first will be “Network name”.
In this option, you will write the name that will identify the new network in your wallet. You can put Polygon Mainnet, Matic, or the name that is most familiar to you to identify the network within the wallet.
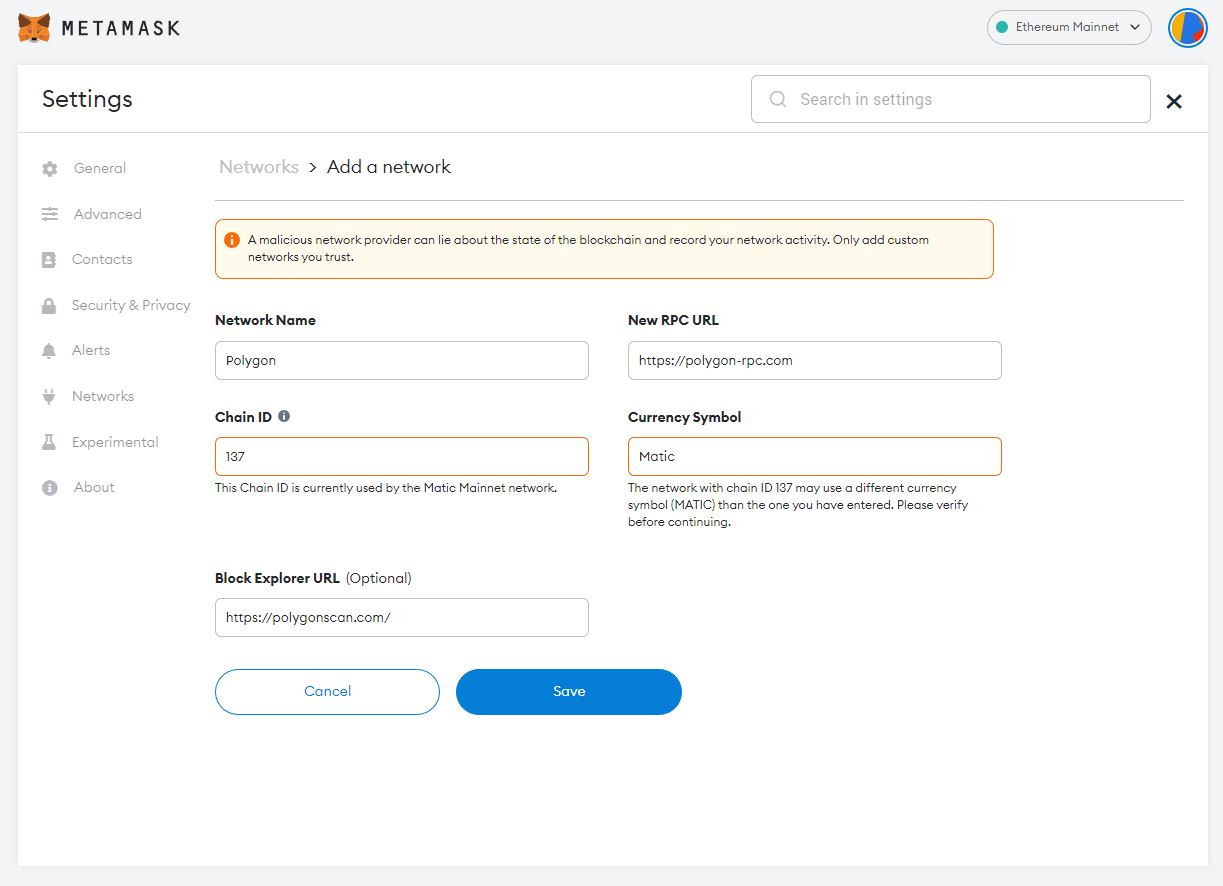
The second will be “New RPC URL”: here you will fill in this data so that the wallet can find the network https://polygon-rpc.com/
The third will be the number that identifies the chain. Chain ID: 137
The fourth is the current symbol: here we will place MATIC
The fifth is optional and defines the block explorer URL where we can check the status of transactions within the network: https://polygonscan.com/
In summary
1- Add Network
2- NewRPC URL: https://polygon-rpc.com
3- Network Name: Polygon Mainnet
4-Chain ID: 137
5- Currency Symbol: Matic
6- Block explorer URL: https://polygonscan.com

Atomatic Metamask configuration
There is an even easier way to configure Polygon Matic in Metamask yes through a link located on the home page of the Polygon project if you display the dApps option from the main menu you will find the Matamask icon with the legend “Add Polygon PoS Network to Metamask”.
If you have the Metamask installed, an approval button will open and the configuration will be completed automatically.
Adding funds
To execute transactions, we must have Matic funds to pay commissions. Therefore, it is necessary to send funds through this network to be able to pay and carry out transactions. How to modify data in Metamask If you want to change any of the data entered in the saved configuration, it can be done easily.
Either because of an error or if in the future there is a configuration change that you must apply. The round button at the top right will display a menu. One of the options will be “Settings”. Then you will look for the “Networks” option. There the different networks that are configured in the wallet will be displayed.
You will search for Polygon (or the name you originally chose) and it will open an editable window to modify the data and then save it.
Conclusion
Metamask is a very powerful wallet that allows you to add different networks. Having the Polygon network with its Matic token will be necesary to access a large number of decentralized applications with low commissions. all
Published on 6 July 2022